
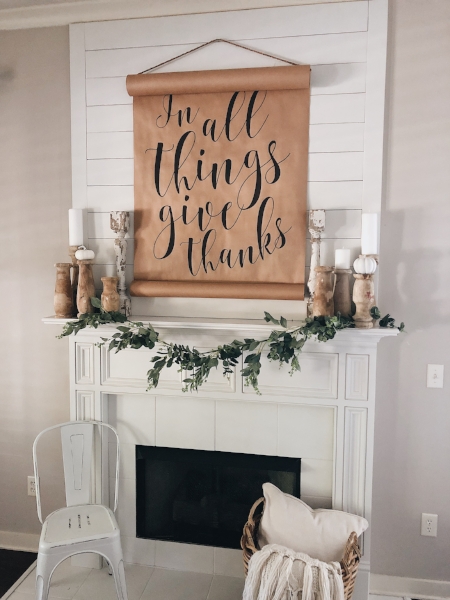
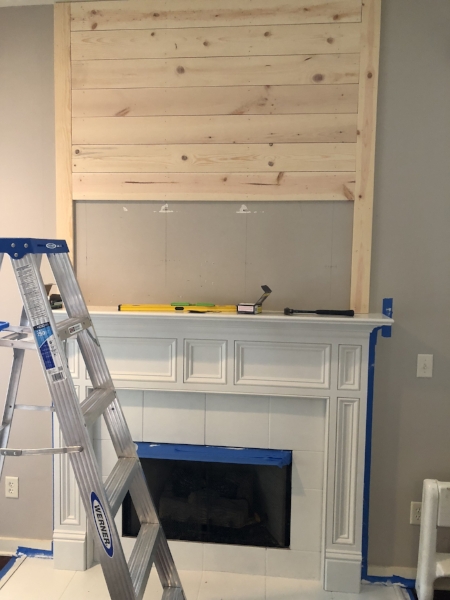
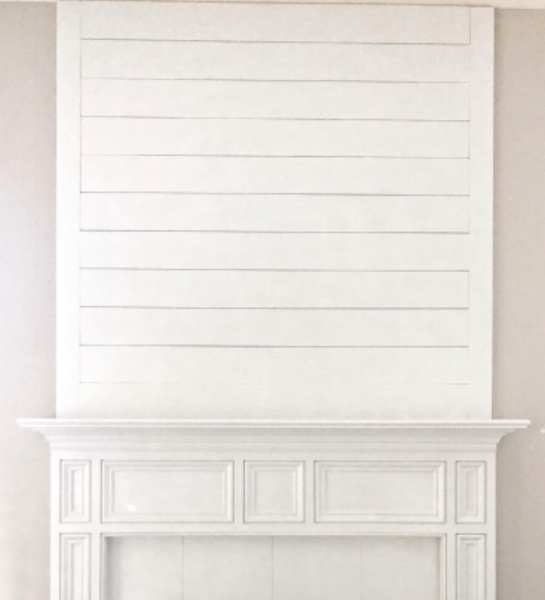
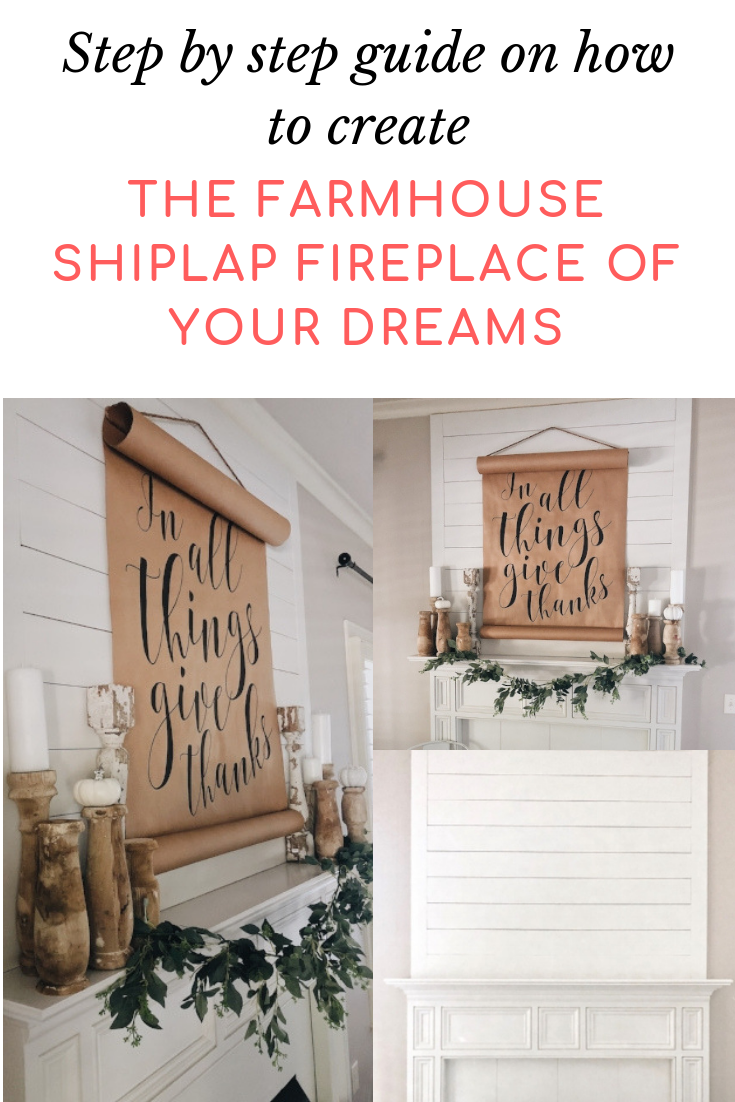
AFTER
As an Amazon Associate, I earn from qualifying purchases. This post contains other affiliate links too. If you click on these links and buy something, I make a commission at no cost to you.
Who doesn’t love a farmhouse-inspired fireplace and mantel? I know I sure do. But what, if you’re like me, you’re stuck with a modern version of a fireplace and mantel that just leaves you with the blahs? You remake it with a little DIY makeover, that’s what!
Protip: Don’t miss out on the next She Gave It A Go DIY; become an Insider here. Get weekly tips, encouragement, special deals, and more! SIGN UP NOW and receive a FREE DIY Guide for making any table the PERFECT chippy paint table.
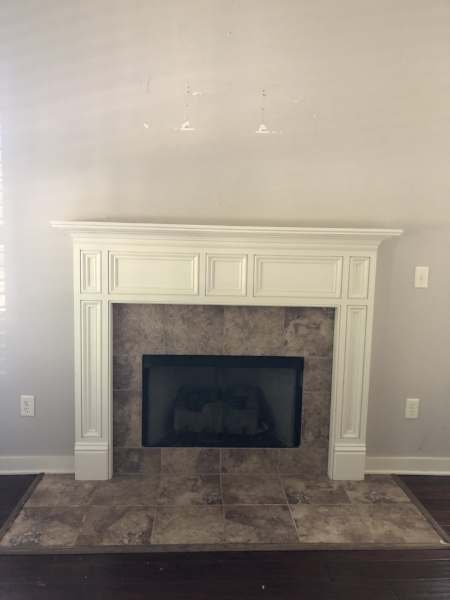
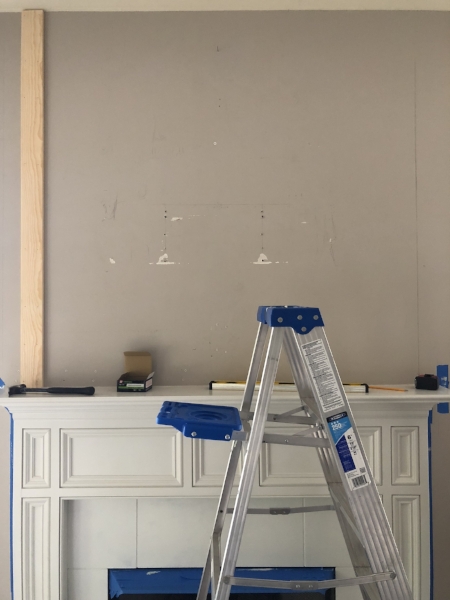
BEFORE
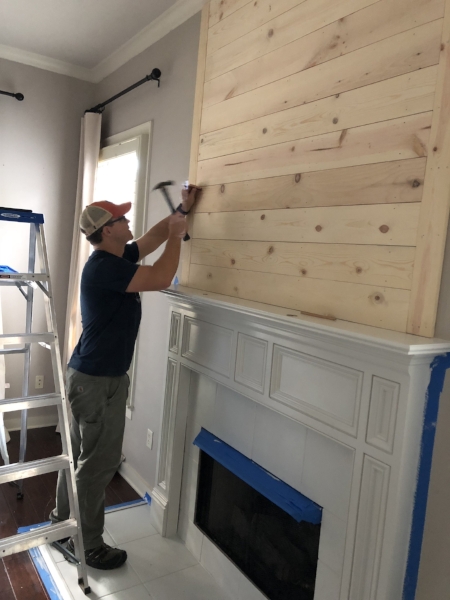
My husband, Andy, is the DIY workforce around the She Gave It A Go homestead. He recently turned our drab fireplace and mantel into a shiplap, farmhouse-inspired focal point. And using this DIY, you can do the same thing.
Since he’s a writer himself, I asked him to whip up this DIY guide that will tell you all you need to know about making a farmhouse fireplace and mantel. Using this step-by-step guide, you’re sure to have the shiplap fireplace of your dreams. So what are we waiting for? Let’s get started.
First things first, you’ll need to know your supply list and what you need to get started. (NOTE: While there isn’t a ton of carpentry expertise involved, you will have to be comfortable using a compound miter saw, or a similar equivalent. You can always get Lowes or Home Depot to cut your boards for you, but it will be hard to get the tight fit you need to really drive home the look.)
Here are the Supplies we needed to make your DIY Shiplap Fireplace:
-
Pencil
-
Hammer and 6D, 2-inch finishing nails (Unless you have a nail gun.)
-
A radial arm saw, compound miter saw, or some other way to cut boards
-
1 x 6’s
-
1 x 4’s
-
Construction adhesive
-
Something to use as spacers (We used quarters. Seriously.)
-
Sandpaper and orbital sander with 220 and 120-grain sandpaper
- Paint (We used Shiplap by Magnolia Home By Joanna Gaines Paint in Trim and Cabinetry )
Protip: You can shop these shiplap fireplace project supplies list on my Amazon storefront HERE.

Step 1: Measuring and Choosing Lumber for your Shiplap Fireplace
FIRST, start by measuring the width of your mantel and the height between the top of your mantel and your ceiling. This will determine how many 1 x 6’s you’ll need to buy. A few things to remember:
-
1 x 6’s are actually only 5.5 inches wide, not 6 inches.
-
You’ll need to account for the space in between boards.
You’ll be using the 1 x 4’s vertically for your outer bands. Simply measure the length of the space between your mantel and ceiling to get those measurements.
Figure out how many boards you’ll need of each dimension and head to your local hardware or lumber store.
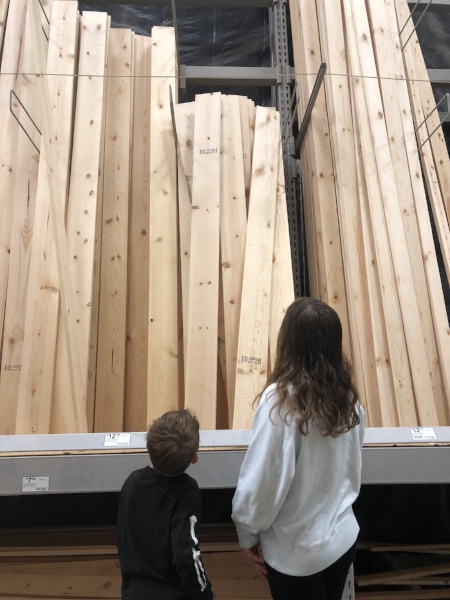
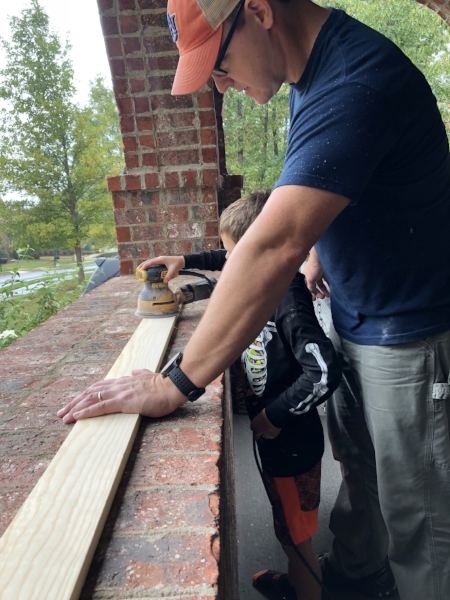
With a project like this, it’s important to select boards that are as “true” as possible. This means boards that are straight, with good edges, and not too many knicks or knots. To true a board, set one edge on the ground, close one eye, bring the board up level with your open eye, and look down the length of the board. You’ll be able to tell immediately if it is warped or crooked. Take the time to only choose boards that are straight (or straight enough).

Step 2: Hanging your vertical 1 X 4’s
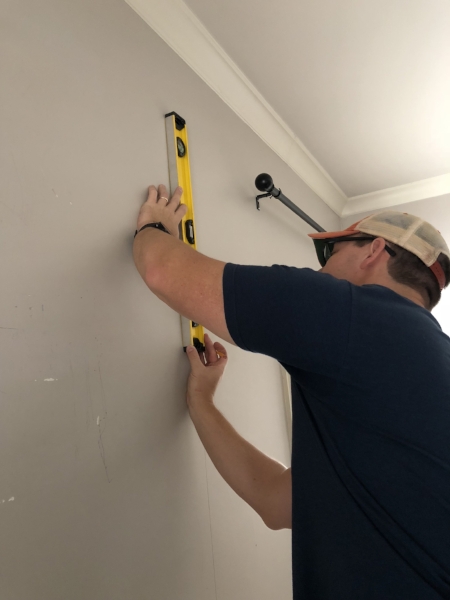
NEXT, you’re ready to place the vertical 1 X 4 bands. It’s important that your outer boards, the 1 X 4’s, are as straight as you can get them. Determine where you want them (we chose to inset ours a little so that the mantel was outside of our 1 x 4 bands), then using a level, draw a vertical line from the mantel to the ceiling. This is the line you will use to set your vertical bands.
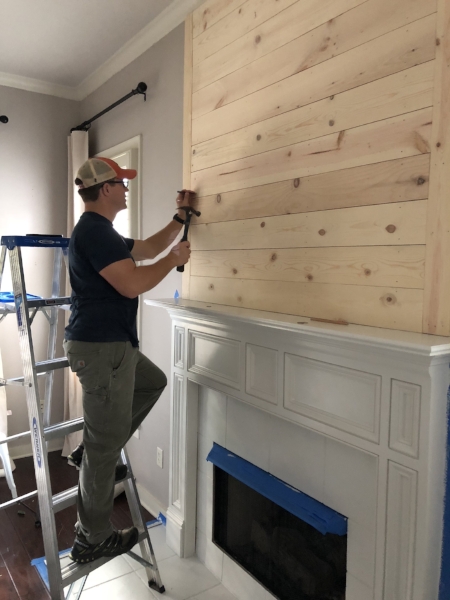
THEN, once you’ve drawn your line and cut and sanded your 1 X 4’s to fit, you’re ready to affix them (I used the 220-grain sandpaper on every board before we attached them to the wall just to give it a smooth surface for painting). Unless you’re super lucky, you most likely won’t hit a stud on these. So this is where using construction adhesive is essential. Put a generous amount on the back of the 1 x 4, and then get to work. Using your hammer and finishing nails, or your nail gun, affix both the vertical 1 X 4 bands to the wall, following your line to make sure they are level.
Step 3: Marking Studs for your Shiplap Fireplace
NEXT, when you’ve set both vertical 1 X 4’s in place, you need to find the studs in your wall between the 1 X 4’s and mark them so that you know where to nail your horizontal 1 X 6’s. You can get fancy here and use a digital stud finder. But because you’re going to be fully covering the wall, you can also use the tried-and-true “hammer finishing nails into your wall every two inches until you find a stud” technique. Once you find a stud, measure from that spot, placing a mark every 16 inches (studs are set 16 inches apart; that’s why increments of 16 are marked in red or black on your tape measure). Using your level, draw vertical lines marking the studs all the way from your mantel to your ceiling. This will be your guide to making sure your horizontal boards are nailed into studs and aren’t going anywhere.

Step 4: Hanging your horizontal 1 x 6’s
This is the easy part. Simply cut, nail, and go. There are five things to remember:
-
You are going for a tight, exact fit of your horizontal 1 x 6’s between the vertical 1 x 4’s, so measure well. Try to avoid hammering or otherwise forcing the 1 x 6’s in because you’ll likely force your 1 x 4’s out of whack. If you need to shave off a half-a-blade width to make it fit, go back to the saw and do so.
-
Start at the top! I know this seems counterintuitive. But most of you will have a space between mantel and ceiling that forces you to “rip” your last board (ripping is making a length wide cut down a piece of wood to make its overall width smaller). In other words, it won’t work out perfectly. You’re going to have to cut one of your 1 X 6’s down to make it fit. You don’t want this piece at the top of your ceiling. You want it closer to your mantel so that all the decorations you are going to put there will cover it up.
-
Don’t forget: Sand your boards before you put them up.
-
Use your spacers. Place quarters, popsicle sticks, old sticks of gum . . . Whatever you choose, be consistent. Use them to make sure the space between your boards is equal and no greater than 1/8th of an inch.
-
Level as you go making any corrections you need to.
Step 5: Setting your Nails
If you used a nail gun and you have it set correctly, your nails or brads will be below the surface of your wood, and you won’t need this step. If you used a hammer, you will want to go back and use a nail set to hammer in the nail head under the surface of the wood. Simply place the nail press on the head of each nail and give it a couple of taps with the hammer. You don’t need to go crazy here. Just enough to get the nail head maybe 1/16th of an inch below the surface of the wood. A few taps usually does it.
Step 6: Spackling your Nail Holes and Sanding Down your Spackle
Using your putty knife, go back over your nail holes placing spackle in them. If you’ve never done this before, I would consider watching a YouTube tutorial on it. It’s really no more complicated than icing a cake. But there are some things to consider. First, remember that you’re going to have to sand down everything you leave. So I try to clean up as much excess as I can. Second, and this is hard to explain, but the proper way to spackle a nail hole is to do so in a way that leaves a little “bubble,” a round, circular hump over the nail hole. In essence, you want to slightly overfill your nail hole. If you do this, when you sand it down it will be flush and virtually unnoticeable when you paint. If you underfill your nail hole, when you sand it down there will be a divot. Which is not good in golf or carpentry.
Additionally, if there are any knots with holes in them, consider spackling over them as well.
(NOTE: If you got a little hammer happy and made dents all over your wood, you can spackle them as well. Just be careful sanding that you don’t sand away all the spackle you used to fill your hammer marks.)
When the spackle has dried (read the directions on your chosen brand of spackling for drying times), use your 120-grain sandpaper and sand down any excess spackle.
Step 7: Clean Up and Paint your Shiplap Fireplace
You’ll need to wipe down all the spackle dust with a damp cloth. Then, if you’re a mediocre painter like me, you’ll want to tape off any edges you don’t want to be painted. Then, you’re ready to paint. There’s really no need to prime the boards. Two coats of paint should suffice.
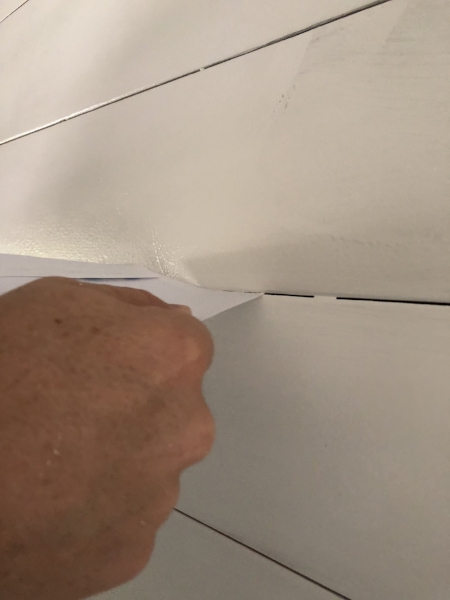
Here is a pro tip: Nothing will kill the look you’re going for quicker that paint drips in the cracks between your boards. One of the things about shiplap that is so pleasing is the clean lines between boards. Having a little paint stuck in between those lines is a killer. So, when you’ve painted all of your boards, go back in with a business card or an envelope and run it between your boards. This gets all the paint out of the cracks between your boards and helps achieve that clean look you wanted all along.
Step 8: Clean up and Decorate your Shiplap Fireplace
Now is the time to clean up, decorate, and show off that finished project! Looking for how to decorate your fireplace?
Check out these posts for inspiration and tips when decorating your mantel and fireplace area:
- How To Create A Lovely Spring Mantel in 10 Minutes
- How To Decorate Your Mantel for Winter In 5 Easy Steps
If you used this tutorial, please tag @shegaveitago in your reveal. We’d love to see the transformation for ourselves.

If you enjoyed this post, I recommend checking out these posts too:
- Welcome Home Saturday: DIY Summer Home Decor Edition
- How To Clean A Faux Shiplap Wall and Style For Fall
I would love for you to stay in touch by subscribing to my weekly newsletter! Get weekly tips, encouragement, special deals, and more!
Sign up HERE and receive a free DIY Guide for making any table the perfect chippy paint table.


I love the way this turned out! We have a blah builder grade fireplace that we want to improve on and this is a great tutorial. Is your mantle painted a glossy paint or matte? Did you go with a matte finish in the Shiplap paint? I lean toward the look of matte paint for shiplap, but I’m wondering if I should just match my mantle paint.
I love this and want to do the same thing to our fireplace. Did you paint the tile around your fireplace or did you re-tile it?
Thank you!
Robin
Hi Robin!
I am so glad you plan to use our guide to install shiplap to your fireplace. We love the way it transforms the space!
And, yes! We did paint the tile…with the same paint.
Happy DIY-ing and thanks for stopping by,
Brendt
This is by far the best DIY shiplap tutorial I have found! Your husband do an excellent job of explaining the process! I appreciate the thoroughness and attention to detail! Thank you for sharing!
I’m just wondering how you matched the crown at top? Is it smaller than the 1×6? Thanks
Is the tile painted or did you re do it? I didn’t see mention of that. Thank you!! Looks awesome.
Hi Cori,
Thank you so much for stopping by! Yes, we painted the tile with the same paint as we used on the shiplap. I hope that helps!
Have a wonderful day,
Brendt