If you’re looking for the ultimate window seat DIY, you’ve come to the right place. There are few things that add more appeal and functionality to a room than a window seat, especially if you’re pressed for storage and seating space. A window seat adds a finished feel to any room. They are great places for kids to relax, read, play video games, or chat with their friends. And here is the great news: they are actually relatively easy to build! This window seat DIY will help The novice DIYer or experienced carpenter easily build a window seat in just a few days.
WINDOW SEAT DIY
[This post contains sponsored links. The items featured and linked in this post were all provided by The Home Depot; all opinions and reviews are my own.]
This article will help you know exactly the steps and supplies so that you can build your own window seat.
Window Seat DIY Supply List
First things first, let’s start with supplies. We use The Home Depot exclusively for all of our DIY needs, and they helped us crush this window seat DIY. We’ve found their selection of supplies and their helpful team to be perfect for DIY projects.
Supplies list for this Window Seat DIY (with some notes.)
- 2 X 4s. (This is what you’ll use to build your frame with. Make sure they are as straight as possible.)
- 2 X 2s (This is what you will use to build the frame of your window seat top should you choose to include a storage option.)
- 1 X 2 trim. (I prefer poplar over MDF, but you can use either.)
- ½ inch plywood (This is what you will use for your seat top.)
- ¼ inch plywood (This will be what you will use for the outer surface of the window seat.)
- Saw (I use THIS DeWalt miter saw from The Home Depot. If you are even an average DIYer, a miter saw is a tool you will use again and again. I love DeWalt products, and The Home Depot carries a wide array of them. Regardless of what saw you use, you will need a way to cut your lumber.)
- Tape measure
- Ryobi countersink drill bit (This is a must-have, and I love THESE from Ryobi)
- 2-inch screws (I love THESE.)
- Kreg Pocket Hole Jig (Whether you use THIS one I used or one of the less expensive offerings, the ability to utilize pocket holes is a must for the serious DIYer.)
- Kreg 2 ½ inch screws
- Sandpaper and sander (We used 120 and 220 grit sandpaper, and we use THIS DeWalt orbital sander.)
- Wood Putty
- Paint (We used Home Depot’s Timeless PPG Paint. We’ve actually painted our entire house with it, and it’s amazing.)
- Carpenter’s square
- Hinges
- DeWalt nail gun or finishing nails
Instructions For Window Seat DIY
STEP 1: Measuring
The first thing you’ll need to do is measure the space where you’ll be placing the window seat. This is pretty straightforward. Measure from the floor to the base of your window trim for your height. Your width is how wide you want your bench to be.
I always make a simple sketch to have with me as a cut and build. Nothing too fancy, as you can see.
![]()
(NOTE: You can see on my drawing that we’re going to do elevated “wings” on ours. That’s because our seat is going to be part of a wall-to-wall built-in cabinet and shelf system. You can choose whether or not you want to add this component to your build. If it’s a standalone seat, I would advise not to add the wings. But they are a useful component and a nice design touch if your seat butts up to a wall or, in our case, another cabinet.)
STEP 2: Building your frame
This is pretty simple, friends. You’re going to essentially make a rectangle box with vertical supports for structure and weight. That’s really about it. Here’s a finished look at the outer frame.
![]()
Start by cutting your runners, the long horizontal pieces that run the length of the window seat. You can see from my sketch that mine were 48 inches long.
![]()
Then, cut your vertical supports. This is an important moment to pause and make sure you’re not getting ahead of yourself. Look back at my sketch. I want my height to be 16 ¾ inches. Now, look back at the picture of my finished outer frame.
I can’t cut my supports to 16 ¾ inches because they will mount under the top and bottom riser (for structural support). I have to account for the risers in my overall height. So, I actually cut my risers to be 9 ¼ inches. This accounts for the 7 inches in height the risers add, PLUS the ¼ inch the plywood will add (once we finish the seat top).
You will need to apply the same logic to cutting the outside ends. These are the horizontal pieces on the outside top and bottom of the frame. As they sit inside the risers, you will need to account for the width of the risers, or your bench will be wider than your original measurements.
Accounting for these details is the difference in success or frustration. (Trust me, I’ve learned the hard way!)
![]()
Once you’ve got all your runners, risers, and outside ends cut, it’s time to assemble your outer frame.
STEP 3: Assembling the outer frame
![]()
This is where your Kreg Pocket Hole Jig comes in super handy. If you don’t have a way to make pocket holes, you’ll need to either screw your risers and outside ends into your runners from the top or “toenail” them in (a less accurate prospect than the pocket hole jig fixes).
Regardless of how you choose to attach them, build your outer frame so that it looks like the picture above.
(NOTE: This is also where a carpenter’s square comes in handy to ensure that everything is square.)
![]()
Step 4: Attaching the horizontal supports
This is when I go in and cut my inside horizontal supports. The only thing to consider here is whether you want to be able to have your window seat function as storage or not. If you want it to serve as storage, you’ll want to account for a lid that will lift as we did. (If you do, you can scroll down to see where we placed our horizontal supports, allowing for the lid.)
![]()
We did not use pocket holes to attach the horizontal supports. You need the screws for structural support. This is where the countersink bit comes in handy. Countersink your holes, then affix the horizontal supports with screws.
(Optional) Step 5: Building the lid
![]()
One of the aspects of window seats that are so awesome is the storage capability. But to access storage, you need a lid. To build the frame for your lid, you’re going to need to determine how wide you want yours to be. Then, drop in two additional horizontal supports. (See the images below.) You’ll then go in about three inches from the back of your frame and drop in a runner. This runner will serve as the back of your lid frame.
You’ll now want to switch over to 2 X 2s to add a lip inside the lid frame. You’re going to drop down 1 ½ from the top of your frame and run 2 x 2s around the interior or your lid frame. (See picture.) This forms a lip for your lid to rest on.
Now, all that’s left is to build the lid (as shown in the picture). This is a super simple build. Make a frame of 2 X 2s that sits firmly (but not too firmly) inside your lid frame, as pictured in the image below.
![]()
Optional Wing Addition
![]()
If you are doing the wing detail, this is the basic look of the frame. The risers and angled braces are joined with pocket holes. The top horizontal braces are attached with countersunk screws.
![]()
Step 6: Dry fit
![]()
Friends, there is a step in carpentry called the “dry fit.” This is when you take what you have built so far and kind of dry-fit it together to make sure your measurements all work. This is the point of no return, lol.
Now is the time to take your window seat from your garage or driveway and drop it into the space it’s going to go. You’re looking for a dry fit. Did you mess up your measurements? Is it too tall? Did you forget to account for the top piece of plywood, etc.?
Though it is absolutely zero fun, this is your last chance to correct any mistakes before plunging on ahead. You might even want to have your little guy or gal give it a test “sit,” or, in Paul’s case, a test “recline.”
![]()
Step 7: Attaching ½ inch plywood on seat top.
![]()
You’ll need to use ½ plywood for the seat top for structural support.
For us, this step was a little more involved because of the wings and the lid. If you have no wings and no lid, this could be super easy! If all you have is a simple seat, I would advise laying your seat on its top on the ½ plywood. Line up the outer edges with the factory edges of the plywood, making sure you’re all square and then trace the seat on the plywood. Using a saw (I prefer a table saw for this, but you could use a jigsaw), cut out the piece for the top of your seat.
If you have built the lid for storage, it’s a little more involved but not difficult. You’ll need to account for the lid, attaching the plywood to the seat top and the lid itself. We use the DeWalt 18 gauge nail gun. If you have a similar nail or brad gun, they come in super handy for projects like this. If not, you’ll need finishing nails to attach the plywood. You’ll also need to attach the hinges similar to how you see them in the picture.
Step 8: Attaching the ¼ inch plywood to the front of the frame.
![]()
Again, this step is pretty simple. Put the ¼ inch plywood next to your seat and trace the edges of your seat on the plywood. Cut it out with a jig saw, and attach it using your brad gun or finishing nails.
Step 9: Attaching the trim.
The options for you here are limitless. You can choose to do decorative patterns, like squares or crosses. Or you can trim the exterior edges of your window seat. The goal is to cover your edges while adding a finished look.
We did a combination of trimming our outside and adding a little flair.
![]()
If you added the wings, you will need a way to cut your 1 X 2 in mitered angles. We used a miter saw for this. But if you only made your window seat as a traditional box, you don’t have to miter your angles. You can butt your ends together and not worry about cutting 45-degree angles where the boards meet. A 45 degree mitered cut is a nice touch, so if you have access to a miter saw or a miter box, you may want to consider utilizing it.
We added two horizontal strips to give the window seat a little more of a creative flair. We considered doing boxes or cross patterns across the front but decided that may have looked a little too formal for a boy’s room.
![]()
Step 10: Wood putty and sanding
At this point, you no doubt have some nail holes, screw holes, and little imperfections here and there. This is where wood putty comes in. You’ll need a putty knife and Wood Putty. The idea is to cover your nail holes and any rough spots and to cover them generously. You’re going to come behind and sand them down.
![]()
If you don’t put enough wood putty on a particular spot, when you go to sand, it could result in a divot, which kind of defeats the purpose of the putty in the first place.
When the putty has dried, you’re ready to sand. I started with 120 grit to bust down the putty and to knock off the rough edges. I finished with 220 to get it nice and smooth before painting.
Step 11: Painting
Once you’ve sanded (and blown/wiped all the sawdust off your window seat), you’re ready for paint. We use a Fuji paint sprayer that is an incredible tool in the DIYer’s arsenal. It provides a virtually flawless coat of paint and can be used to spray stains and lacquers as well. We used PPP Timeless from Home Depot. As mentioned in the supply list, we used this paint for our entire home, and we absolutely love it.
![]()
Whether you brush, roll, or spray your paint, do a light round of sanding between coats. Here’s Paul doing a great job of being a little shop helper.
![]()
![]()
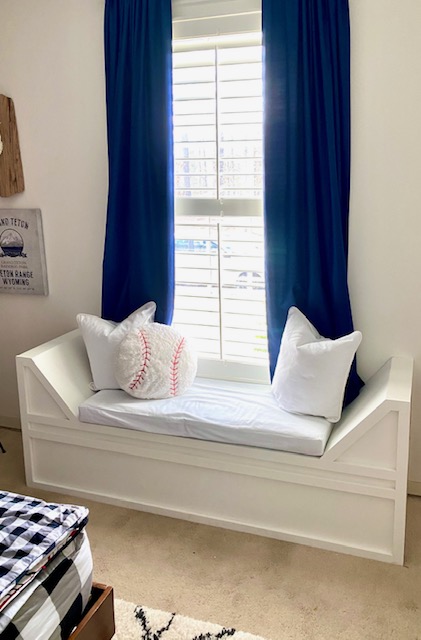
Optional Step 12: Bench cushion
We wanted a softer option for the seat top, so we had foam cut and a slipcover sewn. We finished the wings off with pillows for a cozy touch.
![]()
Well? Did you love this window seat DIY?
This rewarding window seat DIY is a great weekend project that returns years of usefulness and value. What are you waiting for? Jump in and give it a go. You’ll be surprised how easy and fun this window seat DIY can be.
I would love for you to stay in touch by becoming a She Gave It A Go Insider! Get weekly tips, encouragement, special deals, and more!
Sign up HERE and receive a FREE DIY Guide for making any table the perfect chippy paint table.
If you enjoyed this post, I’d recommend checking out these posts too:
